“Electricity is the lifeblood of our modern world, and when the power goes out, it can leave us feeling powerless. That’s where generator wiring comes in. By understanding the basics of generator wiring, you can ensure a reliable power backup solution for your home or commercial space.”
Proper wiring is essential for the safe and efficient operation of electric generators, including portable generators. It is crucial to ensure that the ground wire and power cords are correctly connected. Whether you’re looking to install a new generator or need guidance on existing wiring, we’ve got you covered.
Don’t let power outages disrupt your daily routine or compromise your comfort. With the right knowledge and know-how, you can have peace of mind knowing that your electric generators and portable generators are properly wired with power cords and ready to kick in when needed most. Power equipment direct can help you get the right equipment for your needs.
Wiring an Emergency Generator Using Manual Changeover Switch
We’ll cover everything from the required supplies to operating the connected generator. Let’s get started!
Required Supplies for Wiring
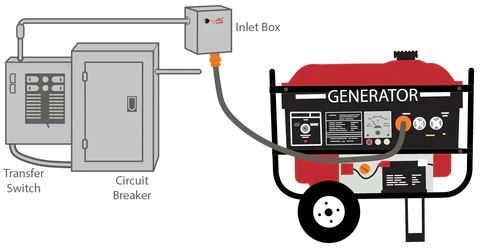
Before you begin wiring your emergency generator, make sure you have all the necessary supplies. These include a manual changeover switch, power inlet box, wires, breaker box, and generator inlet plug. It’s crucial to have these items on hand to ensure a smooth installation process.
Drilling Access Hole for Wiring Installation
To start with the installation process, you’ll need to drill an access hole in your home’s exterior wall. This hole will serve as the entry point for the wires that connect your generator to the breaker box inside your home. Make sure to choose a suitable location and size for the access hole based on your specific requirements.
Mounting Power Inlet Box
Next, mount the power inlet box outside your home near where you drilled the access hole. The power inlet box acts as a connection point between your generator and your home’s electrical system. Ensure that it is securely mounted and properly sealed to protect it from weather elements.
Wiring the Generator Inlet Plug
Now it’s time to wire the generator inlet plug. This plug connects directly to your electric generator and allows it to supply power through the manual changeover switch. It is compatible with portable generators and other equipment, making it a convenient standby solution. Follow the manufacturer’s instructions carefully when connecting wires to ensure proper functioning and safety.
Preparing Breaker Box for Wires
Before installing any wires in your breaker box, make sure it is properly prepared. This involves removing any existing breakers or unused spaces where you plan to install new breakers for connecting your generator. Take precautions such as turning off electricity at main switches before working inside the breaker box.
Installing Generator Breaker and Wires
With all preparations complete, it’s time to install the generator breaker and connect the wires. Install the breaker in an available slot in your breaker box and connect the wires according to the manufacturer’s instructions. Ensure that all connections are secure and properly tightened to prevent any electrical hazards.
Operating the Connected Generator
Once everything is wired and connected, it’s time to test your setup by operating the connected generator. Start by ensuring that your manual changeover switch is set to “generator” mode for electric generators, whether they are portable generators or standby power. Then, start up your generator following its specific startup instructions. Finally, turn on essential circuits one at a time to ensure everything is working correctly.
Wiring a Portable Generator Using Manual Transfer Switch
Required Supplies for Wiring
To wire a portable generator using a manual transfer switch, you’ll need a few essential supplies. These include a manual transfer switch kit, power inlet box, generator inlet plug, wires, and necessary tools like screwdrivers, pliers, and wire cutters.
Drilling Access Hole for Wiring Installation
Before you start wiring your generator, you’ll need to drill an access hole in the wall where the transfer switch will be installed. This hole will allow you to run the wires from the generator to the breaker box safely. Make sure to choose an appropriate location that provides easy access and is close enough to your breaker box.
Mounting Power Inlet Box
Next, mount the power inlet box on the exterior of your house near the access hole. This box serves as an interface between your generator and your home’s electrical system. It allows you to connect the generator safely and provides a secure connection point for transferring power.
Wiring the Generator Inlet Plug
Once the power inlet box is securely mounted, it’s time to wire the generator inlet plug. This plug connects directly to your portable generator and allows it to supply power to your home through the transfer switch. Follow the manufacturer’s instructions carefully when connecting wires and ensure they are tightly secured.
Preparing Breaker Box for Wires
Now it’s time to prepare your breaker box for wiring. Turn off all electricity in your home by switching off the main circuit breaker. Remove the cover from your breaker box and identify where you will connect the wires from your generator.
Installing Generator Breaker and Wires
Install a dedicated circuit breaker in your breaker box specifically for connecting your generator. This breaker ensures that only one source of power is active at any given time – either from utility or from your generator – preventing backfeeding or overloading of circuits.
Carefully route and connect the wires from your portable generator inlet plug to the dedicated circuit breaker in your breaker box to ensure reliable power supply. Ensure that all connections are secure and properly tightened. Double-check the wiring to make sure there are no loose or exposed wires that could cause safety hazards.
Operating the Connected Generator
With all the wiring in place, you’re ready to operate your connected standby generator or portable power generator. Start by fueling up your generator and ensuring it’s in good working condition. Turn off all electrical appliances and devices in your home before starting the generator.
To power your home with the generator, simply switch off the main circuit breaker and turn on the dedicated circuit breaker for your generator. This will allow electricity to flow from your generator through the transfer switch and into your home’s electrical system.
Remember to follow safety guidelines when operating a portable generator, such as keeping it outdoors in a well-ventilated area away from windows or vents to prevent carbon monoxide buildup.
How to Connect a 3-Phase Generator to Home with Automatic Changeover Switch
Required Supplies for Wiring
To connect a 3-phase generator to your home with an automatic changeover switch, you’ll need a few supplies. These include the generator itself, an automatic changeover switch, power inlet box, wires, breaker box, and appropriate tools like drills and screwdrivers.
Drilling Access Hole for Wiring Installation
Before you can start wiring your generator, you’ll need to drill an access hole in your home’s wall or foundation. This hole will allow you to pass the wires from the power inlet box into your breaker box. Make sure to choose a suitable location that is easily accessible and won’t interfere with any existing structures or utilities.
Mounting Power Inlet Box
Once you have drilled the access hole, it’s time to mount the power inlet box on the exterior of your home. The power inlet box should be located near the access hole for easy connection of the generator. Use screws and anchors to secure it firmly in place.
Wiring the Generator Inlet Plug
Now that the power inlet box is mounted, you can proceed with wiring the generator inlet plug. Follow the manufacturer’s instructions carefully and ensure that all connections are secure. It’s crucial to use proper wire gauges and connectors for safety reasons.
Preparing Breaker Box for Wires
Next, prepare your breaker box for connecting the wires from the generator. Ensure that all breakers are turned off before working inside the breaker box. Remove any knockout tabs or covers necessary to accommodate the incoming wires.
Installing Generator Breaker and Wires
With your breaker box prepared, it’s time to install the generator breaker and connect it to your home’s electrical system. Carefully follow all instructions provided by both your generator manufacturer and automatic changeover switch manufacturer. Make sure each wire is connected securely according to its designated terminal.
Operating the Connected Generator
Once all the wiring is complete, it’s time to test your setup and operate the connected generator. Ensure that your automatic changeover switch is in the correct position for generator power. Start up your generator following its specific instructions, and verify that power is being supplied to your home through the breaker box.
Connecting a 1-P & 3-P Portable Generator to the Home Supply
Required Supplies for Wiring
To connect your portable generator to your home supply, you’ll need a few essential supplies. First and foremost, you’ll require a power inlet box that acts as the interface between your generator and your home’s electrical system. You’ll need an appropriate wire gauge, depending on the power requirements of your generator. Don’t forget to have wire connectors, electrical tape, and wire strippers on hand to ensure proper connections.
Drilling Access Hole for Wiring Installation
Once you have gathered all the necessary supplies, it’s time to drill an access hole for the wiring installation. Locate a suitable spot near your breaker box where you can easily route the wires from the power inlet box. Use a drill with a hole saw attachment to create an appropriately sized hole in the wall.
Mounting Power Inlet Box
With the access hole in place, it’s time to mount the power inlet box on the exterior of your home. Choose a location that is easily accessible but protected from rain or other elements. Securely attach the power inlet box using screws or bolts provided with the unit.
Wiring the Generator Inlet Plug
Now comes the crucial step of wiring the generator inlet plug. Begin by carefully stripping off about half an inch of insulation from each wire end using wire strippers. Connect each wire securely to its corresponding terminal inside the power inlet box following manufacturer instructions. Ensure tight connections and use electrical tape or wire connectors for added safety.
Preparing Breaker Box for Wires
Next up is preparing your breaker box for connecting wires from both your main electrical supply and generator. Identify appropriate breaker slots that can accommodate additional circuits from your generator without overloading your system. Remove knockout tabs from these slots using pliers or screwdrivers.
Installing Generator Breaker and Wires
With everything prepared, it’s time to install the generator breaker and connect the wires. Carefully insert the wires into their respective breaker slots, ensuring they are properly seated. Tighten the screws to secure the connections. Double-check all connections and ensure that no wires are loose or exposed.
Operating the Connected Generator
Once all the wiring is complete, you’re ready to operate your connected generator. Start by turning off all electrical appliances and switches in your home. Make sure your generator is in a well-ventilated area outdoors and away from windows or doors. Start your generator following manufacturer instructions, and then turn on individual circuits one at a time using their corresponding breakers.
Connecting a Portable Generator to a Home using Manual Changeover & Transfer Switch
Required Supplies for Wiring
To connect a portable generator to your home using a manual changeover and transfer switch, you will need a few essential supplies. These include:
- Manual Changeover Switch: This is the heart of the system and allows you to switch between the utility power and the generator power.
- Transfer Switch: The transfer switch is responsible for safely transferring the power source from the utility to the generator.
- Power Inlet Box: This box acts as an interface between the generator and your home’s electrical system, allowing you to plug in your generator safely.
- Wires and Cables: You will need electrical wires and cables of appropriate gauge to connect all the components together.
- Electrical Tools: Basic electrical tools such as wire cutters, wire strippers, screwdrivers, and pliers will be necessary for the installation process.
Drilling Access Hole for Wiring Installation
Once you have gathered all the required supplies, it’s time to start the installation process. The first step is to drill an access hole on an exterior wall of your home near where you plan to install the power inlet box. This hole will allow you to route the wiring from the generator into your home.
Make sure to choose a location that is easily accessible and away from any potential obstructions or hazards. Use a suitable drill bit size based on the diameter of the conduit or cable you will be using for wiring.
Mounting Power Inlet Box
After drilling the access hole, mount the power inlet box on an exterior wall near the hole. Ensure that it is securely attached using screws or bolts, depending on the type of mounting hardware provided with your specific power inlet box.
Position the power inlet box at a height that is convenient for plugging in your generator’s power cord. Make sure there is enough clearance around it to allow for easy access and maintenance.
Wiring
Now it’s time to connect the generator to your home’s electrical system. Start by running the appropriate gauge wiring from the power inlet box through the access hole and into your home. Use conduit or cable protectors as necessary to ensure the wiring is well-protected.
Next, connect the wiring from the power inlet box to the manual changeover switch. Follow the manufacturer’s instructions carefully to ensure proper connections and safety.
Finally, connect the wiring from the manual changeover switch to the transfer switch. Again, refer to the manufacturer’s instructions for specific wiring configurations.
Once all the wiring connections are made, double-check everything to ensure there are no loose or exposed wires. It’s crucial to prioritize safety throughout this process.
With the generator properly connected and all wiring secured, you can now operate your portable generator during power outages without worrying about backfeeding or other electrical hazards.
Remember, if you’re unsure about any aspect of the installation process, it’s always best to consult a licensed electrician who can guide you through it safely.
In conclusion, connecting a portable generator to your home using a manual changeover and transfer switch requires careful planning and proper installation. By following these steps and using the necessary supplies, you can ensure a safe and reliable connection that will provide backup power when you need it most.
FAQs
How do I wire a generator?
To wire a generator, start by identifying the power inlet on the generator and connecting it to the transfer switch or main electrical panel using an appropriate power cord. Ensure that you follow the manufacturer’s instructions and consult with a qualified electrician if needed.
Can I connect my generator directly to my home’s electrical system?
No, it is not recommended to connect your generator directly to your home’s electrical system. Doing so can be dangerous and may cause backfeeding, which can harm utility workers or damage appliances. Always use a transfer switch or interlock device to safely connect your generator.
What size wire do I need for my generator?
The size of wire you need for your generator depends on its wattage and the distance between the generator and the electrical panel. It is important to consult with an electrician who can calculate the appropriate wire gauge based on these factors to ensure safe and efficient operation.
Do I need a permit to install a generator?
In many areas, installing a standby generator requires obtaining permits from local authorities. It is essential to check with your city or county building department regarding any necessary permits before installing a generator. This ensures compliance with local regulations and safety standards.
How often should I service my generator’s wiring?
Regular maintenance of your generator’s wiring is crucial for optimal performance and safety. It is recommended to have a professional inspect and service your generator annually, or as per the manufacturer’s guidelines. This helps identify any potential issues early on and ensures reliable operation during power outages.


